
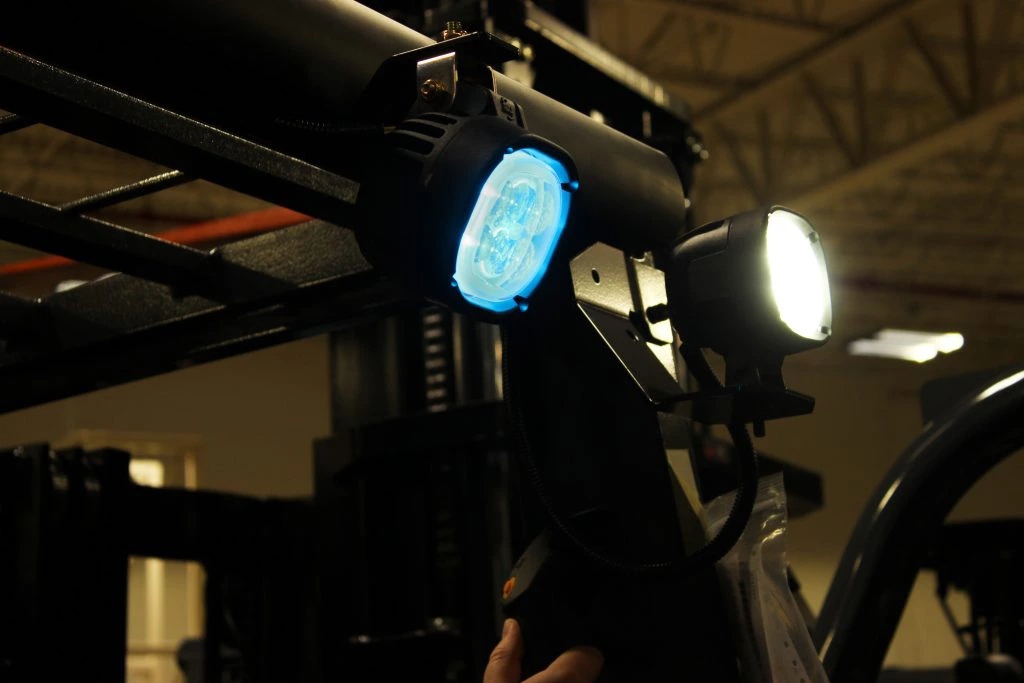
how to hook blue led lights on a forklift
Adding blue LED lights to a forklift improves visibility, safety, and floor marking in warehouses, but proper wiring and mounting are essential. This guide walks through the entire process, from selecting the right light kit to testing the final installation, ensuring compliance with workplace standards.
Why Install Blue LED Lights on a Forklift?
Blue LED lights project a bright blue zone around the forklift, warning pedestrians and other operators of the machine’s presence. Unlike standard headlights, blue LEDs create a high-contrast path on concrete, making forklift movement noticeable even in noisy or busy environments. They also help illuminate blind corners and dock areas, reducing the risk of collisions.
Understanding the Components
Before starting, gather the following parts: a 12V or 24V blue LED light module (depending on your forklift battery), a mounting bracket, waterproof connectors, heat-shrink tubing, electrical tape, zip ties, and a fuse tap or inline fuse holder. Ensure your chosen light has an IP67 rating to withstand vibration and moisture.
Step-by-Step Installation Guide
1. Choose the Mounting Position
Most operators mount blue lights on the overhead guard (roll cage) or the front of the forklift’s carriage. For maximum effect, position the light so it shines slightly downward and forward at a 45-degree angle. Avoid placing it near exhaust or hydraulic lines. Use a test mount with a magnet first to check the beam pattern.
2. Disconnect the Battery
Safety first: turn off the forklift, remove the key, and disconnect the negative battery cable. This prevents accidental short circuits and electric shock. Wait 5 minutes for capacitors to discharge, especially on electric models with regenerative braking systems.
3. Run the Wiring Harness
Use a wiring loom or split conduit to protect the cable from sharp edges and moving parts. Route the wire from the light location down the overhead guard, then along the steering column or mast channel. Secure the harness with zip ties every 20-30 cm. Ensure the cable does not interfere with the tilt cylinders or lift chains.
4. Connect to Power Source
Locate the forklift’s main power distribution box (often under the seat or floor panel). Use the fuse tap to connect to a switched 12V or 24V circuit (e.g., the ignition or headlight circuit). Do not wire directly to the battery unless you add a manual switch, as the light will drain the battery when idle. If your kit comes with a toggle switch, mount it on the dashboard or side panel within reach.
5. Wire the Positive and Negative Lines
Strip the ends of the light’s wires and use butt connectors or solder to join them to the fuse tap and a grounding bolt. The negative (ground) wire should be connected to the chassis using a ring terminal and a clean, unpainted metal surface. Apply heat-shrink tubing over all connections and heat with a heat gun for a waterproof seal.
6. Mount the Light Bracket
Attach the bracket using M8 or M10 bolts, depending on the manufacturer’s specs. If drilling new holes, use a center punch, then a step drill bit to avoid cracking the material. Apply anti-seize compound on threads to simplify future removal. Tighten to the torque specified in the light’s manual.
7. Reconnect and Test
Reconnect the battery and turn the ignition to the ON position. Switch on the light and verify that it illuminates. Check for any flickering, which indicates loose wiring or insufficient voltage. Walk around the forklift to see the beam pattern and adjust the angle if necessary. Use a multimeter to confirm the voltage at the light is between 10.5-14.4V for 12V systems.
Common Mistakes to Avoid
- Using non-waterproof connectors – leads to corrosion and intermittent failures.
- Running wires near the hydraulic pump – exposes them to heat and oil damage.
- Over-fusing – always use the amperage rating specified by the LED light manufacturer.
- Mounting too high – the beam becomes less effective on uneven floors.
Safety and Compliance Considerations
Blue lights are not a replacement for a spotter or audible horn. They should complement existing safety features. Some facilities have specific color-coding regulations, so check with your safety manager. Also, ensure the light does not blind other drivers – aim it 10-15 degrees downward. Many modern forklifts, such as those from Liftron Material Handling, come with pre-wired auxiliary lighting circuits, which simplifies the installation. For lithium-ion models, you may also find a dedicated low-voltage lighting port in the Liftron DL SERIES that accepts plug-and-play LED accessories, eliminating the need for manual tapping.
Maintenance and Troubleshooting
If the Light Does Not Turn On
| Issue | Solution |
|---|---|
| No power at the fuse tap | Check the fuse and replace if blown |
| Loose ground connection | Clean the bolt area and tighten |
| Voltage drop | Use a thicker gauge wire (14 AWG or lower) |
| LED driver failure | Replace the light module |
Inspect the wiring monthly for chafing, loose terminals, or moisture intrusion. Blue LEDs are extremely durable, but the housing can crack under heavy impacts. Periodically clean the lens with a soft cloth and mild detergent to maintain full brightness.
Final Testing and Daily Use
After installation, run the forklift through its full range of motions – lifting, tilting, and traveling – to ensure no wires are pinched or pulled. Test the light during a real shift to see if the beam interferes with operator visibility. If you use the light for floor marking (projecting a zone), check the pattern on different floor textures, like polished concrete vs. rough asphalt. The ideal blue light should create a clear, focused footprint that is visible from at least 15 meters away without causing glare.
By following the steps above, you can safely hook blue LED lights to your forklift in under an hour, improving warehouse safety and operator confidence. Always refer to your equipment’s service manual for specific electrical ratings, and when upgrading your fleet, consider units with integrated lighting options for even simpler installation.


Add a review
Your email address will not be published. Required fields are marked *