
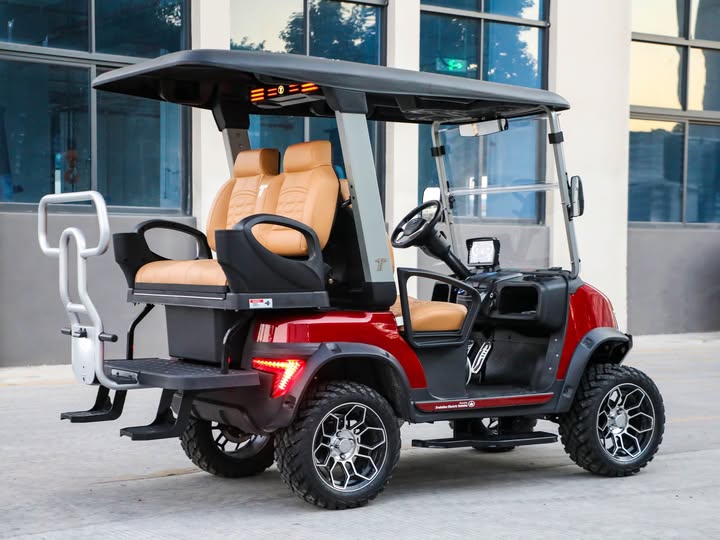
How to Remove a Tara Golf Cart Body?
To remove a Tara golf cart body, disconnect power, remove the seats, detach the roof and supports, disconnect lights and accessories, remove front and rear body fasteners, then carefully lift the body panels away from the chassis.
Tara golf carts use a modular body design that allows many exterior panels to be removed for repairs, customization, painting, accessory installation, battery service, and chassis inspection. Models such as the Roadster 2, Roadster 2+2, Spirit Air, and Spirit Plus use body components attached with bolts, clips, brackets, and trim hardware.
Although the process is straightforward for experienced DIY owners, careful preparation is important. Rushing the removal process can damage plastic panels, wiring connectors, headlights, roof supports, clips, or painted surfaces.
Tools Needed to Remove a Tara Golf Cart Body
Most Tara body removal projects can be completed with common garage tools. The exact tools depend on the model and installed accessories.
| Tool | Purpose |
|---|---|
| Socket set | Removing bolts from seats, roof supports, and body mounts |
| Phillips screwdriver | Removing trim screws and panel fasteners |
| Trim removal tools | Removing plastic clips without damaging panels |
| Wrench set | Holding nuts and removing brackets |
| Electrical tape | Protecting disconnected wiring connectors |
| Label tags | Marking wiring and hardware locations |
| Protective blankets | Preventing scratches on removed panels |
Take photos before removing any parts. Label every connector, bolt group, and bracket so reassembly is faster and mistakes are avoided.
Before Removing the Tara Golf Cart Body
Before starting, park the cart on a flat surface and make sure the vehicle cannot move during the repair.
Complete these preparation steps:
- Park on level ground
- Turn the key switch off
- Remove the key
- Engage the parking brake
- Disconnect the battery if required
- Remove loose items from storage areas
- Protect painted surfaces
Always disconnect the power source before removing body panels near electrical components. Tara electric vehicles may contain battery cables, lighting wiring, displays, controllers, and accessory connections behind body panels.
Tara Golf Cart Body Removal Steps
-
Remove the Seats.
Lift the seat cushions, remove hinge bolts or mounting hardware, and carefully lift the seats away from the frame. -
Remove the Roof and Struts.
Remove the front and rear roof support bolts, then lift the canopy assembly away from the cart. -
Remove the Front Cowl and Hood.
Remove front trim, bumper components, screws, clips, and disconnect headlights or accessory wiring. -
Remove Rear Attachments.
Remove sweater baskets, golf bag holders, utility attachments, and rear accessories. -
Remove Rear and Side Panels.
Remove rocker panels, fender hardware, and rear body fasteners before lifting the panels away. -
Separate the Body From the Chassis.
Carefully lift the body upward while checking for remaining clips, wires, or hidden fasteners.
Step 1: Remove the Seats
The seats are usually one of the easiest components to remove and provide access to hidden body fasteners underneath.
Depending on the Tara model, the seat may be attached using:
- Hinge bolts
- Seat brackets
- Retaining clips
- Frame mounting hardware
Keep all bolts together and label them. Seat hardware may appear similar to body bolts but can have different lengths and thread patterns.
Step 2: Remove the Roof and Struts
Removing the roof creates additional working space and prevents accidental damage during body removal.
| Roof Component | Removal Consideration |
|---|---|
| Front roof supports | Remove bolts carefully and support the roof |
| Rear supports | Check for hidden wiring or accessories |
| Roof panel | Use two people to avoid bending or dropping it |
Some Tara carts may include accessories mounted to the roof area, such as lights, speakers, mirrors, or GPS-related equipment. Disconnect these components before fully removing the roof.
Step 3: Remove the Front Cowl and Hood
The front cowl typically contains important components such as headlights, trim pieces, and electrical connections.
Follow these steps:
- Remove front bumper hardware if equipped
- Remove visible screws and plastic clips
- Disconnect headlights or light bars
- Label wiring connectors
- Lift the front panel carefully
Do not pull aggressively on the body panel. Hidden clips can break easily and replacement clips may be difficult to locate.
Step 4: Remove Rear Body Panels
Rear body removal usually requires removing accessories first. Golf bag holders, rear baskets, storage boxes, and passenger accessories can hide mounting points.
| Rear Component | Action |
|---|---|
| Golf bag holder | Remove brackets and mounting bolts |
| Rear basket | Disconnect support hardware |
| Side rocker panels | Remove screws and clips |
| Rear fender panels | Remove bolts before lifting |
Disconnecting Electrical Components
Modern Tara golf carts include electrical systems connected to body components. Before removing panels, identify every connector attached to:
- Headlights
- Tail lights
- Turn signals
- Brake lights
- Charging indicators
- Displays
- Speakers
- Cameras
- Accessories
Use labels or photos to record each connection. Incorrect reconnection can cause lighting problems, warning messages, or accessory failures.
How to Separate the Body From the Chassis
After removing seats, roof, front panels, rear panels, and wiring connections, inspect the entire perimeter for remaining fasteners.
Common hidden attachment points include:
- Under-seat brackets
- Wheel-well fasteners
- Lower frame clips
- Rear support brackets
- Side mounting points
Once all fasteners are removed, lift the body slowly. If resistance is felt, stop and locate the remaining attachment instead of forcing the panel.
Common Mistakes When Removing a Golf Cart Body
| Mistake | Result |
|---|---|
| Pulling panels without checking clips | Broken plastic mounts |
| Forgetting wiring connectors | Damaged electrical components |
| Mixing bolts together | Difficult reassembly |
| Removing the roof alone | Possible bending or dropping damage |
| Using metal tools on plastic clips | Scratched or cracked panels |
Is Tara a Good Golf Cart Brand?
Tara golf cart models are designed with modern electric vehicle features, lithium battery technology, comfort-focused interiors, and modular components that make maintenance and customization easier.
Tara offers vehicles for golf courses, resorts, communities, campuses, and personal transportation applications. The brand focuses on combining electric efficiency with premium styling and practical features.
| Tara Golf Cart Advantage | Benefit |
|---|---|
| Lithium battery systems | Low maintenance and efficient operation |
| Modern styling | Premium appearance and comfort |
| Modular components | Easier accessory installation and maintenance |
| Multiple configurations | Options for golf courses, resorts, and personal use |
| Electric drivetrain | Quiet operation and reduced maintenance requirements |
How to Prepare for Tara Golf Cart Customization
Many owners remove body panels because they want to install accessories, repair damage, repaint the cart, upgrade lighting, or customize the appearance.
-
Plan the modification.
Identify which panels need removal and what parts will be installed. -
Document the original configuration.
Take photos of wiring, brackets, and hardware. -
Protect removed parts.
Store panels on padded surfaces away from sunlight and moisture. -
Inspect hidden components.
Check wiring, frame condition, battery area, and mounting points. -
Reassemble carefully.
Install hardware evenly and confirm all electrical functions.
Maintaining Tara Golf Cart Body Panels
After removing and reinstalling body panels, inspect the vehicle regularly to prevent future problems.
| Maintenance Item | Recommended Action |
|---|---|
| Body panels | Clean regularly and inspect for cracks |
| Fasteners | Check for looseness after use |
| Electrical connectors | Keep dry and properly secured |
| Plastic clips | Replace damaged retainers |
| Paint surfaces | Protect from chemicals and harsh cleaners |
Final Answer
Removing a Tara golf cart body is a manageable DIY project when performed carefully. The basic process involves removing the seats, roof, front cowl, rear accessories, body fasteners, and electrical connections before lifting the panels away from the chassis.
Always disconnect power before working near electrical components, label every connector, organize hardware, and avoid forcing plastic panels that may still have hidden clips attached.
Tara golf cart models use modular designs that support maintenance, repairs, and customization. With proper preparation and the correct tools, owners can safely remove body panels for upgrades, restoration, and accessory installation.


Add a review
Your email address will not be published. Required fields are marked *