
Install Seat Belts on a Club Car Precedent Golf Cart (Tools, Mounting Points, Safety)
Add seat belts to your Club Car Precedent the right way. This guide covers required parts, factory-style mounting points, correct torque, and safety checks so your golf cart carries passengers confidently.
Why add seat belts to a Club Car Precedent
Seat belts reduce ejections on rough paths, stabilize riders during quick stops, and make family or neighborhood driving safer. With the right hardware and mounting strategy, you can install belts that look OEM, operate smoothly, and resist loosening over time.
What materials are needed to install seat belts on a Club Car Precedent golf cart?
- Seat belt kit: Two-point (lap) or three-point (lap/shoulder) retractable belts rated for powersports/UTV use.
- Mounting solution: A seat belt mounting bar made for the Precedent, or heavy-duty steel brackets with backing plates (minimum ~1/8" thick) for any new holes.
- Hardware: Grade 8 (SAE) or 10.9 (metric) bolts, matching nyloc locknuts, and large-diameter flat washers. Common sizes: 7/16-20 (SAE) or M10 (metric) as dictated by your kit.
- Tools: Socket/box wrenches, torque wrench, drill and step bit (if adding holes), deburring tool, measuring tape, marker.
- Safety & finish: Blue threadlocker, anti-corrosion paint for bare metal, edge grommets for pass-throughs, zip ties or loom for tidy routing.
Where are the mounting points located for attaching seat belts on a Club Car Precedent golf cart?
The Precedent uses an aluminum frame with steel substructures. For strong, repeatable installs:
- Front row: Use a seat belt bar that bolts to the steel seat frame/uprights beneath the front seat base, or factory-style holes in the seat support bracket if your bar/kit is designed for them. Avoid attaching to body plastic.
- Rear-facing seat kits: Most quality rear seat frames include belt tabs on the steel grab-bar uprights or crossmembers. Use those welded tabs; if absent, add brackets with backing plates through the steel frame rails.
- Anchor orientation: Lap-belt anchors should sit near hip level with a slight rearward/downward angle (about 45° down from the occupant to the anchor) and minimal side offset for even load paths.
Safety basics before you begin
- Park on level ground, set the brake, remove the key; if equipped, switch to Tow/Maintenance.
- Never mount belts to plastic, thin sheet metal, or wood. Tie into steel structures or a purpose-built bar.
- Use backing plates anywhere you drill new holes to spread load and prevent pull-through.
- Follow the torque values provided with your kit; if none are given, typical seat-belt anchors fall in the ~30–55 ft-lb range depending on bolt size—confirm for your hardware.
Installation steps (front seat example)
1) Prepare the cart and layout
- Remove the seat bottom for access. Identify solid steel mounting points (seat frame rails, uprights, or kit-provided bar locations).
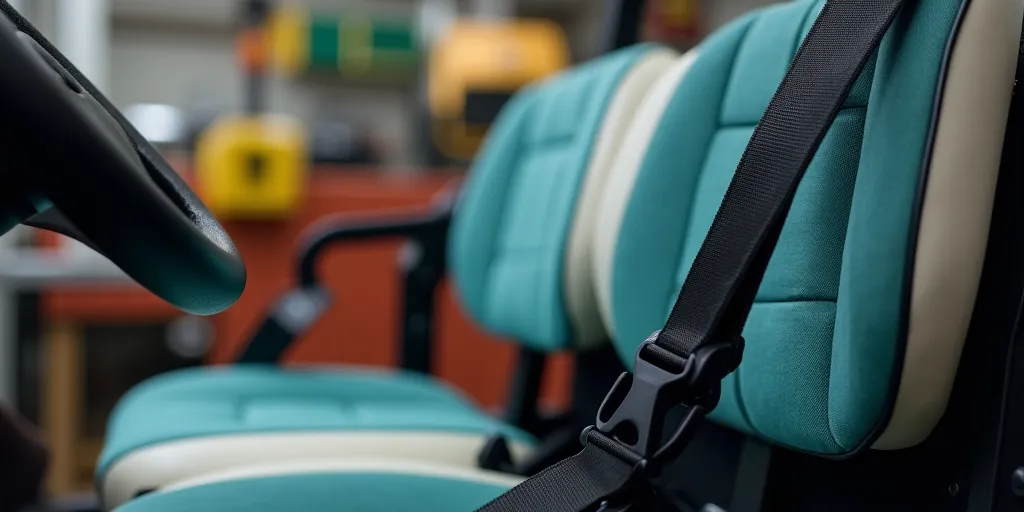
- Mock up belt positions: buckles should land comfortably at the occupant’s hips without rubbing seat edges or interfering with the seat hinge.
2) Install the mounting bar or brackets
- Position the Precedent-specific belt bar under the seat base (or align heavy-duty brackets to the steel frame). Ensure the bar sits level and clears the seat hinge and fuel/electrical components.
- Bolt the bar/brackets using the provided hardware. If drilling is required, mark, drill, and deburr; add painted backing plates on the opposite side before installing nyloc locknuts.
3) Attach the belt anchors
- Mount the retractor and fixed-end anchors to the bar/brackets. Maintain correct belt angle: anchors slightly behind and below the hip line, symmetric left/right.
- Install the buckle ends to the center tabs on the bar or to a reinforced central bracket. Buckles should stand upright and be reachable without twisting the webbing.
4) Torque, finish, and function check
- Apply blue threadlocker to clean threads; torque bolts to the kit or hardware specification. Use large washers where the belt eyelets meet the bracket.
- Cycle each retractor: pull smoothly to full length, ensure lock-up on a sharp tug, then retract fully without sticking.
- Reinstall the seat; check that hinges and storage lids clear the belts and hardware.
How can you ensure that the seat belts on a Club Car Precedent golf cart are securely fastened?
- Structural integrity: Verify every anchor ties into steel—never plastic. If you added holes, confirm backing plates are present and seated flat.
- Correct torque: Use a calibrated torque wrench; recheck after the first ride, and again after a week of use.
- Hardware quality: Use Grade 8/10.9 bolts with nyloc nuts (or lock washers + threadlocker) and large-diameter washers under belt eyelets.
- Belt path & comfort: The lap strap should ride low across the hips, not the abdomen. Buckles must latch positively and release cleanly.
- Retractor performance: Belts should extend/retract smoothly and lock when tugged sharply or when tilted per the unit’s design.
- Periodic inspection: Monthly, inspect for fraying webbing, bent brackets, loose hardware, or corrosion. Replace damaged parts immediately.
Rear seat kit notes
If your Precedent has a rear flip seat, use the welded tabs on the seat frame’s uprights. For carts lacking tabs, install a compatible belt bar or through-bolt brackets with backing plates to the steel frame crossmember. Keep the belt path clear of the flip mechanism and cargo bed.
Final checklist
- All anchors attached to steel with backing plates where needed.
- Bolts torqued and marked with witness paint or a marker line.
- Belts extend, lock on tug, and retract fully without rubbing.
- Seats/hinges operate normally; belts stow neatly when not in use.
With solid mounting points, quality hardware, and proper torque, your Club Car Precedent gains safe, dependable seat belts that integrate cleanly—and your golf cart is ready for confident family rides and neighborhood trips.


Add a review
Your email address will not be published. Required fields are marked *